Introduction
This article is not an endorsement of the use of generative AI.

Stable Diffusion WebUI
I hate AI-generated pictures and believe that typing prompts is no better than actually drawing pictures.
However, it is my belief that knowing is better than being completely ignorant, which is why I have written this article.
If you are involved in any creative endeavor, never mess with Stable Diffusion. I’ve given you a piece of advice.
Arch Linux + RX7900XT + Stable Diffusion WebUI
There are many articles on how to install Stable Diffusion (SD) on Arch Linux, but none of them seem to be favorable, either by adding an unofficial repository (arch4edu) or by using Docker to run it as a privileged user1.
Of course, there is the official way to do otherwise.
This is the way, but when I installed python-pytorch-opt-rocm and python-torchvision-rocm
system globally, even if I added the option
--system-site-packages when creating the virtual
environment I could not handle ROCm from Python and gave
up.
Unlike those cases, this time I found a method that does not affect the existing environment as much as possible, so I wrote this article so that even beginners can understand it as much as possible.
I’m not sure if there’s a demand for this article, I wish it will be useful to someone.
Environment
Manjaro Linux (6.6.47-1-MANJARO)
Python 3.12.5
AMD Ryzen 7 7700X
AMD Radeon RX7900XT
Manjaro is not actually Arch Linux, but I treat it as Arch this time. “Unstable” packages in Manjaro’s repo corresponds to “stable” in Arch’s repo, so there might be some differences in version but I think it’s no problem. We are going to install AUTOMATIC1111/stable-diffusion-webui (SD WebUI) and assume that you already have a model.
For a AUR helper, I use paru, but please replace it whatever you are using, such as yay or trizen.
The installation directory is
~/stable-diffusion. It is better to install in a
place where there is enough space, because it already occupies
about 30GB of space when the minimum installation is
completed. In my case, I use an extra 512GB SSD mounted by
systemd.
By the way, PyTorch has not yet migrated to Python 3.12 as of now (2024), and SD WebUI seems to have a stance that it will not support Python 3.12 until PyTorch does. Therefore, if you are using Python 3.12, you need to install an older version of Python.
Python 3.8-3.11 is generally installed by default on any of our supported Linux distributions, which meets our recommendation. – Start Locally | PyTorch
Since this kind of support changes quickly, I recommend that you visit the official PyTorch website to check which versions of Python are supported.
Preparation of StableDiffusion WebUI and Python 3.10 virtual environment
At first, install required dependencies. You can ignore Python3 this time because the specific version of python will be needed later.
You can ignore Python3 only this time because we are going to install the specific version of python later.
$ sudo pacman -S --needed wget gitInstall Python3.10 from AUR. (I heard that Python 3.11 is also OK, but I chose 3.10 this time because it has been tested the most.)
$ paru -S python310cd to the installation directory (~/stable-diffusion) and clone the SD WebUI repo.
$ cd ~/stable-diffusion
$ git clone https://github.com/AUTOMATIC1111/stable-diffusion-webui
cd to the cloned repo (it is going to be the root directory of SD) to generate a virtual environment.
$ cd stable-diffusion-webui
$ python3.10 -m venv venv
This command will create a Python 3.10 virtual environment
directory named venv inside the
stable-diffusion-webui directory.
To activate the virtual environment, type:
$ source venv/bin/activateIf you check the version in this state:
$ python --version
# => Python 3.10.14
you will see that the version has been switched to the older one.
To deactivate the virtual environment and return to the system global, just type:
$ deactivate(BTW) What is a Python virtual environment?
A Python Virtual Environment is simply the use of different versions of Python installed in a non-global location. With a virtual environment, you can use the latest version of Python on the system, while switching versions for programs like SD WebUI that require a specific older version of Python.
Especially for Arch-based distributions, thanks to the rolling release, the versions of many things are updated on their own, so I think it is easy to appreciate the virtual environment that allows you to keep a partial older version of the execution environment.
The command to create a virtual environment is
python -m venv [directory of virtual environment],
and the directory name does not have to be venv
but I strongly recommend you keep venv because
this is standard and easy to understand. There are several
other ways to create a virtual environment (e.g. conda, pyenv,
etc.), but I recommend you to use venv because it is a
built-in module and it is easy to manage packages with pip. It
is also easy to dispose of venv by putting it in
the trash when you no longer need it.
When you activate the virtual environment, the directory of
the virtual environment (venv) is temporarily added to the top
of the PATH, and the python command is replaced
with the version of Python that created the virtual
environment. It is not sufficient to make this just a shell
script, because the environment variables of the original
shell must be rewritten, and it is necessary to execute it
faithfully with the source command.
Incidentally, if you take a look at the SD WebUI issues, you will see an endless stream of asking for advice on a problem which the Python virtual environment can easily solve.
Install SD WebUI’s requirements
You will find requirements.txt in
stable-diffusion-webui and use it to install the
required packages.
Remember to activate the virtual environment before installing! (If you do not activate the virtual environment, it will be installed on the system global)
$ cd ~/stable-diffusion/stable-diffusion-webui
$ source venv/bin/activate
$ pip install -r requirements.txt
A large number of packages
venv/lib/python3.10/site-packages should be
installed.
Now, test if you can handle ROCm from Python torch. Just type:
$ python -c 'import torch; print(torch.cuda.is_available())'or, Using Python’s interactive interpreter:
$ python
>> import torch
>> torch.cuda.is_available()
See whether True or False is returned.
ROCm behaves as if it were CUDA if available from PyTorch, so you can check the availability of ROCm this way2.
If False is returned, then all is well; just uninstall torch and torchvision and replace them with the ROCm version. (If it is True, you can skip the next step.) If you get any other errors, it is most likely that you skipped the previous step or got the order wrong somewhere.
Install ROCm version of Torch and TorchVision
This is the most important part: uninstall torch and torchvision.
$ pip uninstall torch torchvisionPress y in the confirmation dialog to
uninstall the two packages.
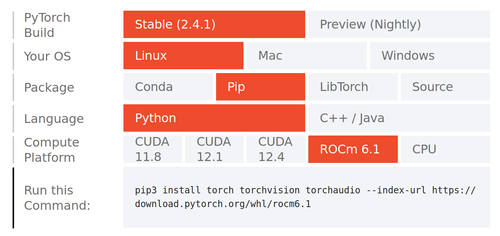
Then install the ROCm version. You can find the latest version at Start Locally | PyTorch.
I installed the latest version, ROCm6.1, as follows.
torchaudio should not be necessary, but it is included in the
webui.sh file in some reason.
$ pip install torch torchvision torchaudio --index-url https://download.pytorch.org/whl/rocm6.1It is a heavyweight package and should take some time there. After the installation is complete, test if you can handle ROCm from torch in Python again.
$ python -c 'import torch; print(torch.cuda.is_available())'
# => True
If True returns, you have succeeded. The next step is to introduce the model.
Install models
You had better use copyright-conscious models.
The official model by Stable Diffusion can be downloaded from stable-diffusion-v-1-4-original. However, some people may not like this at all. Most of the models that claim to be “copyright-conscious” are created by “additional learning” on Stable Diffusion’s models, so as long as the original Stable Diffusion models are learned in a way that disregards creators, no matter how considerate they are, the fundamental problem remains the same. The problem will remain the same no matter how carefully the original Stable Diffusion model is used.
In this sense, AI Picasso, a Japanese company, has released commonart-beta and this may be on the right track3. However, I omit here which model to introduce and how to introduce it, so please obtain it by yourself.
Place the models (.safetensors and .ckpt files) in
stable-diffusion-webui/models/Stable-Diffusion
and the VAE (.pt files) in
stable-diffusion-webui/models/VAE.
Initial startup and UI settings
cd to stable-diffusion-webui and execute
webui.sh.
$ cd ~/stable-diffusion/stable-diffusion-webui
$ ./webui.sh
You don’t have to activate venv this time because
webui.sh looks up for it and activates
automatically.
After execution, open http://localhost:7860 by
a browser and you will see the WebUI.
UI settings
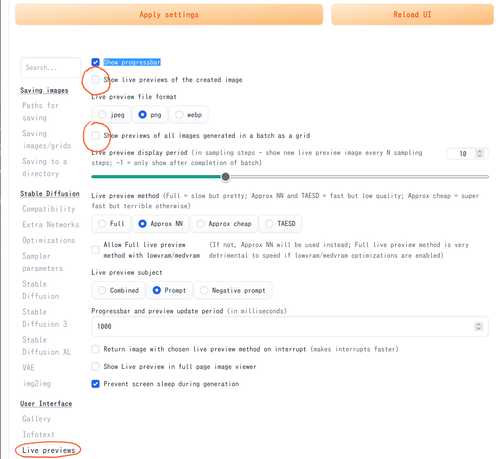
You might as well change settings below.
Settings > User Interface > Live previewsUncheck the following two checkboxes to disable preview during generation. (It increases generation speed)
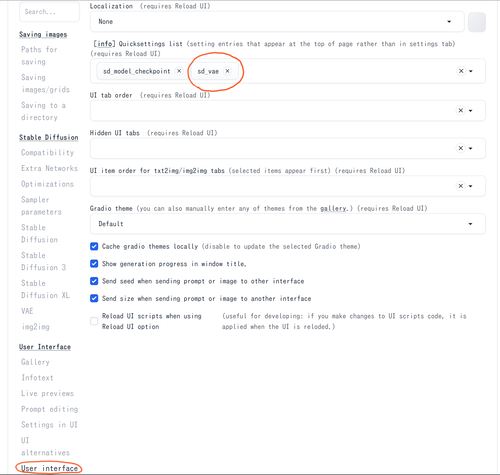
Settings > User Interface > User interfaceAdd sd_vae to the Quick settings list to make
VAE selectable from the UI.
Commandline arguments etc.
Edit webui-user.sh for other trivial
settings.
When a gray image is generated, add the following line.
export COMMANDLINE_ARGS="--precision full --no-half"If you want to change the port from 7860 to another, you can do the following.
export COMMANDLINE_ARGS="--port 8080"
↩︎Additionally, to check if your GPU driver and CUDA/ROCm is enabled and accessible by PyTorch, run the following commands to return whether or not the GPU driver is enabled (the ROCm build of PyTorch uses the same semantics at the python API level link, so the below commands should also work for ROCm):
import torch torch.cuda.is_available()The developer says that they have been trained only from datasets provided under CC-BY-4.0 and CC-0. 商用利用できる透明性の高い日本語画像生成AI、CommonArt βを無償公開|AI Picasso↩︎


